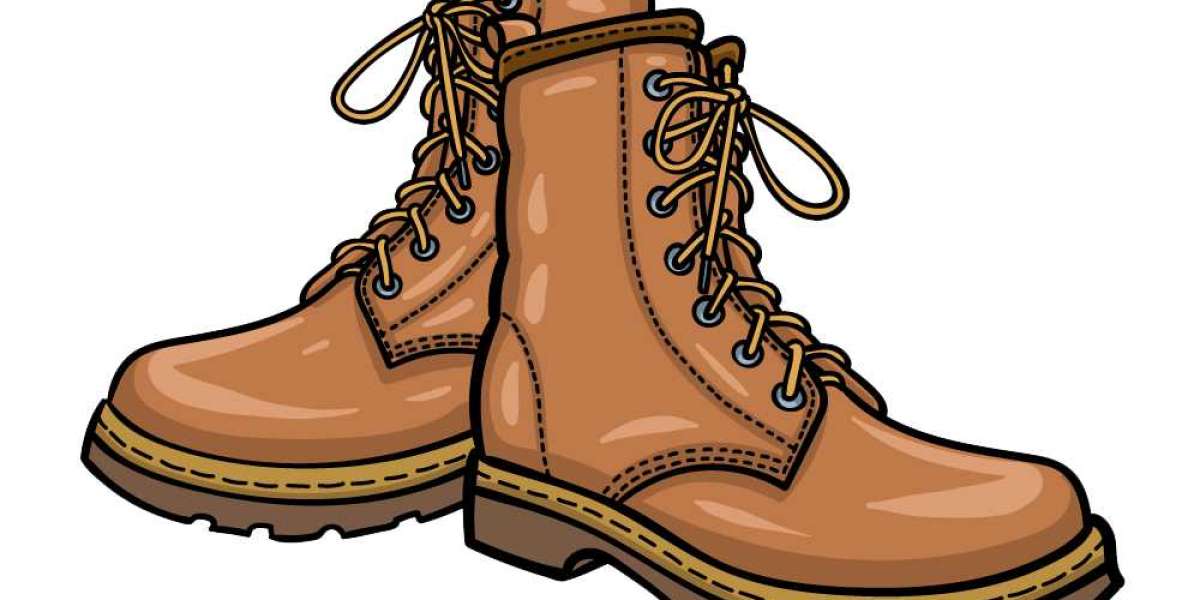
Boots Drawing Ideas
Footwear can come in a wide range of shapes, sizes and styles. A few shoes are made only for rich style, while others are created to be extremely useful. Boots would be an extraordinary illustration of the subsequent choice, as they help to keep feet safeguarded in even the hardest territory.
Visit the Children coloring pages for kids’ education.
In any event, while simply taking a gander at boots, there is a lot of assortment even with only this one kind of footwear. This can make figuring out how to draw boots somewhat of a test! Assuming you might want to know how you can do it effectively while having a great time simultaneously, then this is the most ideal aide for you! Our bit by bit guide on the most proficient method to attract boots only 6 stages will show you all that you want to be familiar with drawing these solid shoes.
Step 1 - how to draw Boots
We will start this aide on the most proficient method to draw boots with one of the trickier parts of the picture. These will be the bands on the neck of the boots, however before we add those we will initially draw the neck of the boot. Utilize a few smooth, somewhat bended lines for the edge at the highest point of the boot, and afterward broaden a line down for the rear of the boot.
Then, we will draw those bands. While drawing these, you might need to utilize a pencil while intently following the reference picture to begin with. When you have the bands looking as they do in our model, we will be prepared for the second step of the aide.
Stage 2 - Presently, begin drawing the following part of the boots
This second step of your boots drawing will see you adding the following part of the boot body and the bands. In the first place, expand the rear of the neck of the boots down further. Then, we will add more lines of circling bands. You can likewise draw a few little circles around the region where the bands circle through the boots.
These will address the little metal rings that add a sturdiness to the ribbon openings on the boots. It's as simple as that now, and afterward we can continue to stage 3 to this draw.
Stage 3 - Attract the foundation of the boots this step
For the third piece of this aide on the most proficient method to draw boots, we will draw the thick base of the shoes. These bottoms will as a rule be extremely thick to keep the feet from any sharp or perilous items on the ground.
To start with, utilize a few stunning lines under the boot for the highest point of these thick soles. Then, at that point, we will draw the foundation of the soles. These will be drawn utilizing a few additional rugged lines, as the need might arise to be somewhat more finished to give footing to the wearer. When this sole is drawn we can continue on in the aide.
Stage 4 - Next, draw another boot
We will add a second shoe to your boots attracting this fourth step. While doing this, you will do all that you learned in the past step besides in turn around! This subsequent boot will confront the other way to the first, yet if not it will appear to be indistinguishable.
Essentially draw the neck of the boot with the bands and different components as you accomplished for the past one. When this subsequent boot is drawn, we can then add the last subtleties as we continue to the fifth step of the aide, so when you are prepared we should continue on!
Stage 5 - Add the last subtleties to your boots drawing
Both of the shoes have been drawn, and presently we can add a few last subtleties in this following stage of our aide on the most proficient method to draw boots. A large portion of the subtleties we will include this step will be genuinely minor, however they will assist with making the boots look more sensible.
In the first place, add a few little lines to the edges and the sides of the boots to show the sewing keeping them intact. You can likewise add a portion of these little lines along the foundation of the shoes. Whenever you have drawn these subtleties, you can likewise add a few additional subtleties of your own.
You could attract your own experience to show what sort of setting these boots are being put away in. What different items or pieces of clothing do you suppose could be put away with these boots?
Stage 6 - Polish off your boots drawing with variety
Presently it is the right time to polish off this boots drawing for certain varieties. Boots are normally intended to be truly strong for brutal circumstances, so they will generally be produced using extreme substances like calfskin. This is the look that we went for in our model picture.
We involved different shades of browns for the boots to give them that rough look, and you could go for a few comparable varieties assuming you would like a comparable style for your image. While these are absolutely a few tones you can utilize, you could likewise go for some totally one of a kind variety decisions you might like!